
Fitting & cut-sheet guide.
Not sure how to show the fitting you need? Start with the guide below. A clear sketch, complete dimensions, and labeled connections help us quote and fabricate your order with fewer follow-up questions.
What should I put on my sketch?
Label every opening with width × height. For example, 20″ × 20″ means 20 inches wide and 20 inches high. Include both dimensions at each end, even when the sizes match. Then add the lengths, throats, or offsets shown below.
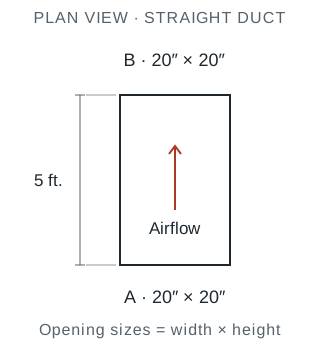
Example only · not to scale. Both openings are 20″ wide × 20″ high, with a 5-foot section length. Replace these measurements with your actual sizes.
Straight rectangular duct
- Both opening dimensions: write width × height at end A and end B. A width by itself does not describe rectangular duct.
- Section length: show the length between the end faces. Write the units clearly: inches or feet.
- Connections: label the connection required at end A and end B.
- Quantity and specifications: add quantity, material, gauge, and liner requirements. For lined duct, state whether sizes refer to the metal or the clear inside opening.
For round straight duct, provide diameter in place of width × height.
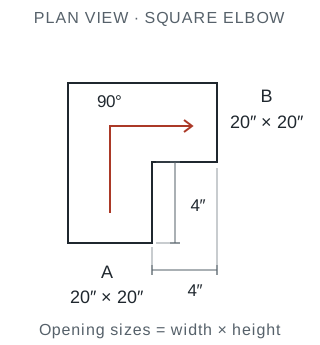
Example only · not to scale. A 90° square elbow with 20″ × 20″ openings and a 4″ throat at each end. Each throat runs from the inside corner to its end face; 4″ is not the overall outside length.
Rectangular elbow
- Both end sizes: write width × height at A and at B, even when they are the same.
- Both throat dimensions: for a square elbow like this one, dimension each inside leg from the inside corner to its end face. The example shows 4″ on each leg.
- Angle, style, and orientation: state the bend angle and elbow style. Label the view and airflow direction. For a radius elbow, show the required radius and where it is measured.
- Other required dimensions: show any specified outside/heel dimensions, end extensions, or changes in opening size.
- Vanes and connections: state turning-vane requirements and label the connection at A and B.
The 4″ throats illustrate this example; they are not a default for every elbow. Mark any unknown style or dimension as a question.
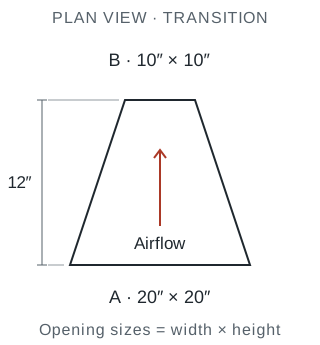
Example only · not to scale. A 20″ × 20″ opening transitions to 10″ × 10″ over a 12″ length. This example is centered in both width and height.
Rectangular transition
- Four opening dimensions: give A width, A height, B width, and B height. In this example, both width and height change from 20″ to 10″.
- Fitting length: show the distance between the end planes, not the sloping side length. Include any required straight extensions.
- Alignment in both directions: say whether the fitting is centered in width and height. If a side is flat, identify it: top, bottom, left, or right.
- Offsets and views: dimension any sideways or up/down shift and state the measurement reference. Add labeled top and side views to show changes that one view cannot describe.
- Connections and orientation: label connections at A and B and draw an airflow arrow.
“Flat on one side” needs that side identified on your sketch. For a round end, use its diameter instead of width × height.
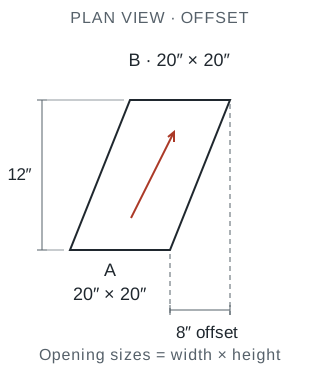
Example only · not to scale. Both ends are 20″ × 20″, with 12″ between end planes and an 8″ sideways shift measured between matching right edges. This example has no up/down offset.
Rectangular offset
- Both end sizes: label width × height at A and at B, even when the sizes match.
- Fitting length: show the distance between the end planes, not the sloping side length. Dimension any straight extensions separately.
- Offset amount and direction: mark each sideways and up/down shift. The example shows an 8″ sideways shift; use a side view for an up/down offset.
- Measurement reference: label whether the offset is measured between centerlines or matching edges. This drawing uses matching right edges.
- Views and connections: label top/side views, airflow, and the connection at each end. Write 0 or “none” for any direction with no offset.
If both end sizes change, include the transition dimensions too. A perspective photo alone may not show the direction or amount of each offset.
The details we need with each fitting.
- Job name, fitting mark, and quantity.
- All dimensions with units and clearly labeled views.
- Material and gauge requirements.
- Liner type and thickness, or specify unlined.
- For lined duct, identify whether your dimensions describe the metal size or clear inside opening.
- Connection required at each end.
- Any vane, reinforcement, or other project-specific requirement.
- Desired completion date. Mark rush requests clearly.
Straight rectangular duct
| Item / quantity | D-01 / 10 sections |
|---|---|
| Dimensions | 24 in. wide × 12 in. high |
| Section length | 5 ft. between labeled end faces |
| Material / gauge | Enter project requirements |
| Liner | Unlined |
| Connection A / B | TDF / TDF |
| Needed by | Enter date and rush status |
Illustrative format. Replace every example or instruction with your actual order details.
Ready for our estimating team.
Send a PDF, spreadsheet, or clear photo of your completed sheets. Include the full page, keep the writing readable, and send all views needed to understand each fitting.
Can you quote directly from construction plans?
We do not perform takeoffs from construction plans. Please send your completed fitting cut sheets or takeoff list showing the items you need fabricated.
Do my sketches have to look professional?
A clear, legible sketch is useful. Label the views, include every needed dimension, and identify both end connections. Use our blank cut sheets to keep the information organized.
What if I don’t know an elbow style or connection?
Mark the question on your sheet or call 720-491-3410. We can clarify fabrication details with you before an order is finalized.
How should I show round fittings?
Write the diameter at every round end. Include the fitting length, angle or offset, connection type, material, gauge, liner if needed, and quantity. For round-to-rectangular transitions, give the round diameter and rectangular width × height.
Can you handle rush jobs?
Yes. We offer quick lead times and can accommodate rush orders. Call with your list and required date so we can confirm scheduling for your job.